
Introduction
In this article, we will set up a Middle/Guard Relay on the Tor network. We used a Debian 11 (Bullseye) in this example.
Before going any further, be sure to understand the implications of this type of relay by reading my dedicated article first!
1. Installing Tor
To make this tutorial easier, we’ll install tor from our package manager.
apt update && apt install tor
2. Configuring Tor
Your Tor service configuration is defined in the file: /etc/tor/torrc.
You can edit it with your favorite text editor, which for me is nano.
nano /etc/tor/torrc
This file will probably be pre-filled but everything will be commented out. You can either empty it manually, or add your configuration to the very end of the file.
Here’s a good example of the starting configuration I recommend for setting up a simple Tor relay.
Nickname MetalRelay # Replace "MetalRelay" with a cool nickname. It will be publicly visible.
ContactInfo contact(at)domain(dot)com # This email will be publicly accessible. Obfuscate this address a little to avoid spam.

ORPort 443

ExitRelay 0
ExitPolicy reject *:* # Ensure IPv4 never exits the relay directly.

SocksPort 0
ControlSocket 0
ControlPort 9051
CookieAuthentication 1
3. Restart the Tor service
Restart the Tor service to apply this new configuration.
systemctl restart tor@default
That’s it, you’ve deployed your first tor relay!
4. Going further
4.1 Firewall
Naturally, if you are behind a firewall, it will be necessary to open some ports to allow users to use your relay, but this depends on your infrastructure.
In particular, it will be necessary to check ports in the ORPort (TCP) or DirPort directives.
4.2 Checking your relay is working
To make sure that the tor daemon is up and running, look for an entry in your logfile (syslog) similar to this one:
Self-testing indicates your ORPort is reachable from the outside. Excellent.
Publishing server descriptor.
Usually after 3 hours of activity, your relay should appear in the Relay Search. You can find yours by IP, Nickname or Fingerprint.
4.3 Understanding the Life Cycle of a Relay
Each type of relay on the Tor network will go through a defined lifecycle. This cycle allows new relays to be progressively tested and gradually made available on the network according to their respective capabilities.
There are 4 distinct phases:
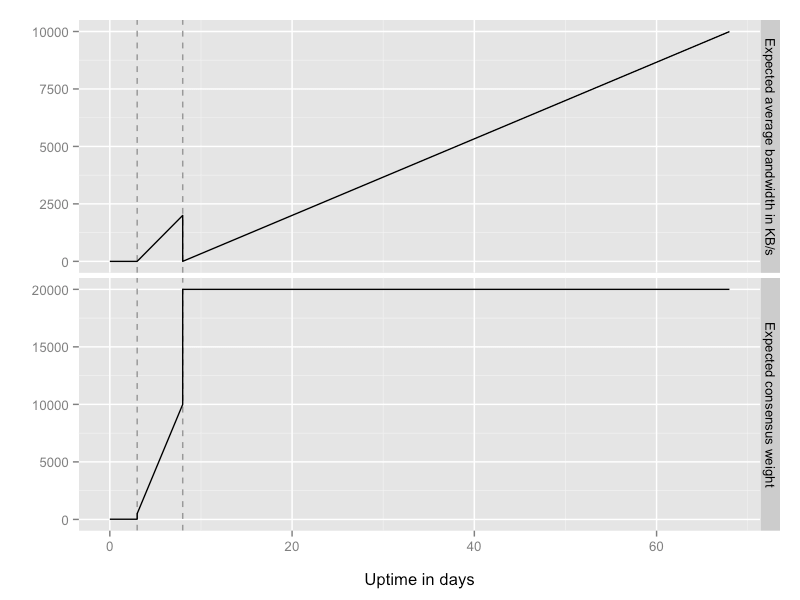
- Day 0-3, the unmeasured phase.
In this first phase, your relay will receive very little traffic. It will first perform various bandwidth tests on itself, make this information publicly available, and the network will regularly come and check the veracity of this statement.
- Day 3-8, Remote Measurement.
In this second phase, your relay will gradually gain reputation (consensus) and thus be used by its first users.
You thus become a Middle Relay (and not yet a Guard Relay: it’s normal you just started, be patient!).
By providing your service to users, you will naturally gain reputation and attract new users. This phase also ensures that your bandwidth is always sufficient and will be compared to other relays. Naturally with this additional set of data, this phase allows you to strengthen your ability to be a “good node” (speed, stability, uptime…) and gain confidence.
- Day 8-68, gradual rise as a Guard Relay.
In this third phase, your relay will gradually become a Guard Relay if the network has no problem with it.
It is the Directory Authority that will decide whether or not to apply the Guard flag to your relay. This flag is assigned based on three characteristics: bandwidth (with a fairly high consensus), average uptime (your node must be active the majority of the time) and “known since” (to make network attacks more difficult, naturally we don’t want to assign the Guard rank to nodes that have just been created)
Your relay is eligible to be flagged as a Guard as of day 8. Tor clients will now be able to use your relay as their first point of entry to the network.
- Day 68+, the steady state as a Guard Relay.
This is the final stable state that you can expect to reach after ~12 weeks of service.
In this state, you maintain a stable number of clients (balance between new clients using your node and those who remove it from their personal list).
Congratulations. :)
4.4 Enable IPv6 support
If you have access to an IPv6 address on your server and it is configured, you can choose to run on IPv4, or IPv4+IPv6. Currently, it is not possible to have an IPv6-only Tor relay.
Add these lines to set up IPv6 support on your relay.
ORPort [your:ipv6:address]:443 # Add here your public facing IPv6. Keep the [].
ExitPolicy reject *:*, reject6 *:* # Line already exists, just add the last part.
Let’s not debate the future of IPv6 here, but know that by providing your service over IPv6, you’re allowing more users to take advantage of the Tor network.
4.5 Enable statistics collection via Nyx
Install and run Nyx.
apt install nyx
sudo nyx
4.6 Aggregate your relays into a “Family” (recommended)
You just have to add the MyFamily directive in your /etc/tor/torrc and fill in for each host the members of its family.
This line will probably be the same on all your nodes.
MyFamily RELAY_1_FINGERPRINT, RELAY_2_FINGERPRINT
You can find this fingerprint in the tor service logs, in nyx or directly on the public relay search provided by TorProject.org.
5. Last words
I hope this article has helped you set up your first Middle/Guard Relay on the Tor network. Please note that there is a few other types of relays (bridge, exit-nodes…) to try!
After proudly maintaining your relay for 2 months (and if you average 500 KB/s traffic or if you run an exit node on port 80 with 250KB/s), you can also send an email to the #TorProject to receive some cool goodies to thank you for your work! From memory, it’s a t-shirt, some stickers and the joy of having participated in a project bigger than yourself.
Again, congratulations! :)